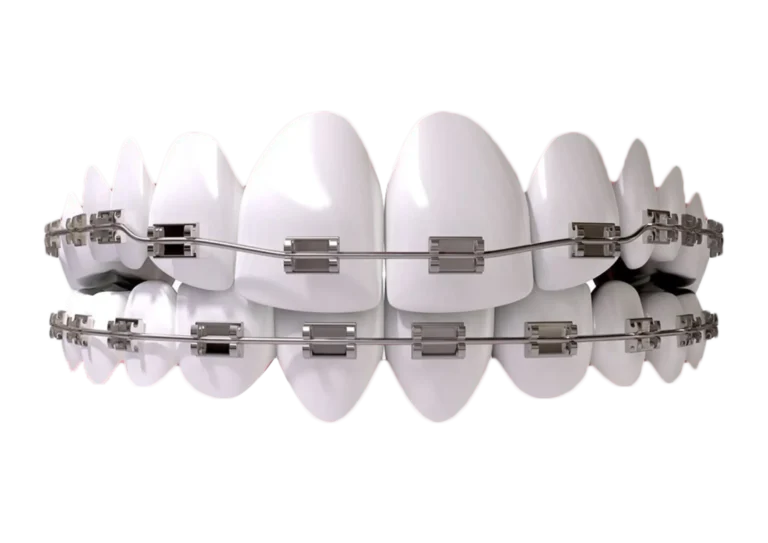
How to Correct Teeth Using Tooth Clips (Dental Braces): A Complete Smile Transformation Guide
Misaligned, crooked, or spaced teeth can do more than just affect your confidence when taking photos—they also make chewing harder, cause abnormal enamel wear, and create hidden crevices where plaque loves to hide.
In everyday conversation, many people refer to orthodontic brackets simply as “tooth clips“ (दांतों की क्लिप). Whether you are dealing with minor gaps or severe crowding, tooth clips remain the gold standard, time-tested solution to achieve a healthy, straight, and functional smile.
What Exactly Are Tooth Clips and How Do They Work?
Tooth clips—clinically known as dental braces—are orthodontic devices designed to exert continuous, gentle, and controlled pressure on your teeth over time.
This consistent biomechanical force slowly remodels the surrounding alveolar jawbone: bone tissue breaks down on the side where pressure is applied and rebuilds on the opposite side, safely guiding each tooth into its ideal position.
A typical fixed tooth clip system consists of:
- Brackets (Clips): Small metal or ceramic squares bonded directly to the front surface of each tooth.
- Archwire: The thin, flexible metal wire threading through the clips that guides tooth movement.
- Ligature Ties (Elastics): Tiny coloured or clear rubber bands holding the wire securely within each bracket slot.
- Molar Bands / Buccal Tubes: Anchors cemented on the back molars to support the system.
Key Types of Tooth Clips Available Today
Gone are the days when bulky metal was the only option. Modern orthodontic solutions offer choices tailored to your aesthetic preferences and budget:
| Clip Type | Material & Appearance | Key Advantages | Best For |
| Traditional Metal Clips | High-grade stainless steel | Extremely durable, cost-effective, handles complex bite corrections reliably | Kids, teenagers, and budget-conscious adults |
| Ceramic (Tooth-Colored) Clips | Translucent or white ceramic | Blends naturally with enamel color; far less noticeable | Working professionals and college students |
| Self-Ligating Clips | Metal or ceramic with built-in slide doors | Eliminates rubber bands, reduces friction, easier to clean, requires fewer adjustment visits | Faster appointments and busy schedules |
| Clear Aligners (Invisible Clips) | Medical-grade transparent plastic trays | 100% removable, virtually invisible, no dietary restrictions | Mild-to-moderate alignment with maximum aesthetics |
The Step-by-Step Teeth Correction Journey
Correcting your teeth using clips involves a structured clinical process:
- 1. Diagnostic Evaluation & Imaging: Digital panoramic X-rays (OPG), lateral cephalograms, and intraoral scans or impressions are taken to analyse your jawbone, root angles, and bite alignment.
- 2. Surface Preparation & Bonding: The tooth enamel is thoroughly cleaned, conditioned, and dried. The dentist bonds individual brackets onto each tooth with specialised adhesive and cures them with a blue LED light.
- 3. Archwire Insertion: The initial flexible nickel-titanium (NiTi) wire is threaded through the brackets and secured with elastic modules.
- 4. Monthly Routine Adjustments: Every 4 to 6 weeks, you visit your dental clinic to replace modules, tighten or step up to thicker wires, and monitor tooth movement.
- 5. Debonding & Polishing: Once teeth are perfectly aligned, the brackets are safely removed, and adhesive residue is polished off without damaging enamel.
- 6. Retention Phase: A custom fixed wire or removable clear retainer is provided to ensure your teeth stay permanently in place while bone tissue fully stabilises.
Daily Care: Keeping Your Clips & Teeth Spotless
Maintaining oral hygiene with clippers is essential to prevent white spot lesions, gum swelling, and cavities:
- Use an Orthodontic Toothbrush: Look for V-groove bristles designed specifically to clean around brackets and wires.
- Incorporate Interdental Brushes: Use tiny proxy brushes to sweep away trapped food particles between adjacent clips.
- Avoid Damaging Foods: Say no to sticky candies, chewing gum, hard nuts, ice cubes, and biting directly into whole apples or corn on the cob (always slice them into small pieces first).
- Rinse After Every Meal: A quick water rinse after snacking prevents sugars and acids from settling around bracket margins.
How Long Does the Treatment Take?
For most mild spacing or crowding issues, noticeable improvements appear within 6 to 9 months, with total treatment lasting 12 to 18 months. Complex bite issues (overbites, underbites, crossbites) may take up to 24 months. Consistency with monthly adjustment appointments is the key to finishing on schedule.
A consultation with an orthodontic specialist will determine the exact clip type and timeline needed to build your ideal smile.